
A flawless blowout can be the ultimate game-changer for your hair routine, whether it’s for a special occasion, a business meeting, or simply to feel confident in your everyday life. The voluminous, smooth, and shiny look of a professional blowout can turn heads, but achieving it at home can seem daunting. With the right technique, tools, and a bit of practice, anyone can master the art of the blowout. This essay will guide you step-by-step through the essential tips and tricks that will ensure you achieve a perfect blowout every time, from preparation to final styling touches.
Step 1: Start with Clean Hair
A flawless blowout begins with clean, freshly washed hair. Dirty or product-laden hair can be difficult to style and may not hold the shape as effectively as clean strands. Opt for a clarifying shampoo once a week to remove buildup, and use a gentle shampoo for regular washes.
When washing your hair, be sure to condition it properly. Use a lightweight conditioner if you want volume and body, or a richer formula if your hair is dry or damaged. After conditioning, gently towel-dry your hair by patting, not rubbing. Excess moisture will make styling more difficult, so make sure your hair is damp but not dripping wet before beginning the blowout process.
Step 2: Prepare with the Right Products
The right products are essential for creating the perfect blowout. Depending on your hair type, you’ll need a mix of styling aids that provide hold, volume, and shine. Here’s a breakdown of what to use:
- Heat Protectant: To avoid damage from the blow-dryer, a heat protectant is a must. Spraying this onto damp hair creates a barrier that shields your hair from high heat, helping it maintain its health.
- Volumizing Mousse or Foam: For extra lift and volume, a mousse or foam can work wonders. Apply it to the roots and distribute it evenly through your hair. This adds body and helps keep the style in place.
- Leave-In Conditioner or Serum: If your hair tends to frizz, a leave-in conditioner or smoothing serum can help control it. These products smooth the hair cuticle and ensure a shiny, polished finish.
- Texturizing Spray (Optional): If you want to add texture and a little bit of grit, a texturizing spray is a great option. Apply it to the ends of your hair for an effortless, lived-in look.
Make sure not to overload your hair with too many products, as this can weigh it down and reduce volume.
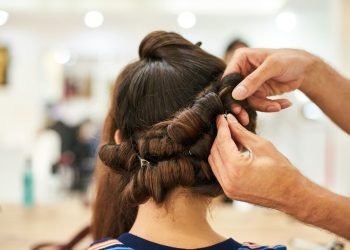
Step 3: Section Your Hair
One of the most crucial aspects of a perfect blowout is working with smaller sections of hair. Trying to dry all of your hair at once can result in uneven results, and it can take longer to achieve the smooth, voluminous look you want.
Divide your hair into at least three sections: top, middle, and bottom. Use clips to keep each section separated. Starting with the bottom section allows you to work your way up without disturbing the hair you’ve already styled. This method also ensures you can give each section the attention it needs.
Step 4: Choose the Right Blow-Dryer and Tools
A good blow-dryer is crucial for achieving a perfect blowout. Choose a blow-dryer with multiple heat and speed settings, as well as a concentrator nozzle to direct the airflow precisely where you need it. Blow-dryers with ionic technology are ideal because they reduce frizz and lock in moisture, making your hair look shinier and smoother.
In addition to your blow-dryer, a round brush is one of the most important tools for creating volume and curl. The size of the round brush you choose will depend on the type of blowout you want to achieve. For loose waves and soft volume, opt for a medium-sized brush. For tight curls, use a smaller barrel, and for maximum volume, choose a larger brush. You should also consider the material of the brush—natural bristles are ideal for smooth, shiny results.
Step 5: Master the Blow-Dry Technique
Now that you have the right products, tools, and hair sections, it’s time to begin drying. The key to a perfect blowout is to work with the heat and airflow rather than against it.
- Start from the roots: Begin by positioning the round brush near the roots and focusing the airflow there. The heat will help lift the roots, creating volume. Slowly pull the brush through your hair while following with the blow-dryer. Move the dryer from root to tip to ensure that the hair is smooth and fully dried.
- Use tension for smoothness: When wrapping your hair around the round brush, make sure to apply tension. Gently pull the hair taut while rotating the brush. This will give you a sleek and smooth result without frizz.
- Rotate the brush for curl or wave: To add a subtle curl or wave, rotate the brush as you dry. If you’re aiming for more defined curls, roll your hair up tightly around the brush and hold the dryer in place for a few seconds before releasing.
- Work with the sections: Dry each section thoroughly before moving on to the next. Always start from the bottom layers and work your way up to ensure that the weight of your hair doesn’t affect the sections below.
Step 6: Finish with Cold Air
Once you’ve finished blow-drying all the sections of your hair, give your hair a final blast of cold air using the cool setting on your blow-dryer. The cold air helps to close the hair cuticle, locking in shine and setting the style. This simple step will also add a touch of volume and prevent frizz.
Step 7: Add Final Touches
After your blowout has cooled down, it’s time to give it a little more polish. Use your fingers or a wide-tooth comb to gently separate the layers of your hair, especially if you’ve used a lot of tension with the round brush. If you want extra volume, you can tease the roots lightly with a fine-toothed comb, being careful not to overdo it.
If your blowout needs more texture or hold, finish with a light-hold hairspray. Avoid heavy hairsprays that can make your hair stiff or crunchy. A light mist of hairspray will provide just the right amount of hold without compromising the natural bounce and movement of your blowout.
For a shiny, fresh finish, you can also apply a small amount of shine serum or hair oil to the ends of your hair. This adds luster and helps smooth out any flyaways, leaving your hair looking glossy and healthy.
Step 8: Maintain Your Blowout
A perfect blowout doesn’t last forever, but there are ways to maintain the look for longer. Avoid touching your hair too much throughout the day, as this can cause it to lose volume and shape. If you need to freshen up, use a dry shampoo to soak up excess oil and restore some lift at the roots.
In the evening, you can preserve your blowout by loosely pinning your hair in a top knot or using a silk pillowcase, which minimizes frizz and preserves your style.