

Beach waves are the perfect hairstyle for those who want to achieve a laid-back, carefree look without the need for a beach vacation. They embody a sense of relaxed beauty, often associated with sunny days by the ocean and soft, wind-swept hair. The best part is, you don’t need to live near the coast or have a professional stylist to achieve these effortless waves. With the right tools, techniques, and products, you can create stunning beach waves at home that last all day long. This guide will take you through the process of achieving beach waves without the hassle of complicated styling methods, leaving you with an effortlessly chic look that’s perfect for any occasion.
Understanding the Look
Before jumping into the steps, it’s important to understand what beach waves really are. Beach waves are characterized by loose, natural-looking curls with a tousled, lived-in vibe. Unlike traditional curls, which tend to have a more uniform shape, beach waves are intentionally imperfect and often lack defined, smooth curls. Instead, they mimic the natural texture of hair after spending a day at the beach — slightly tousled, with volume and body, but still looking soft and touchable. The goal is to create a tousled texture that looks as if you just walked out of the water and let your hair air-dry in the sun.
Step 1: Start with Clean, Damp Hair
The foundation of any great hairstyle is healthy, clean hair. Start by washing your hair with a gentle shampoo and conditioner, preferably ones that add volume and texture. After washing, towel-dry your hair to remove excess moisture. Beach waves work best when the hair is slightly damp but not soaking wet. The idea is to create a texture that holds, so it’s crucial not to let the hair dry too much before starting the styling process.
To enhance the texture of your waves, apply a salt spray or texturizing spray to damp hair. Salt sprays are designed to mimic the effect of saltwater, which is one of the reasons they’re so effective for creating beach waves. They add grip and texture to the hair, helping the waves stay in place longer.
If your hair tends to be on the finer side, you may also want to use a lightweight mousse or volumizing product to add some body and lift at the roots. For thicker or coarser hair, a leave-in conditioner or light styling cream can help reduce frizz and give your waves a smoother, polished finish.
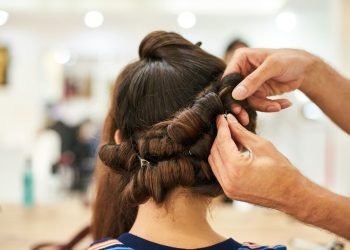
Step 2: Section Your Hair
Once your hair is prepped and ready, divide it into sections to make styling easier and more organized. If you have long hair, section your hair into three to four layers — bottom, middle, and top — and clip them up to ensure you’re working with smaller, manageable sections at a time. For medium to short hair, two sections should suffice. Creating these smaller sections allows you to focus on one area of the hair at a time, ensuring that every strand is styled properly.
Step 3: Use a Curling Iron or Wand
The key to creating beach waves at home is using the right tool. A curling iron or a wand with a tapered barrel works best for achieving soft, loose waves. Ideally, choose a curling iron or wand that has a barrel size of around 1 to 1.5 inches. A larger barrel will give you softer, looser waves, while a smaller barrel will create tighter curls, which you can then pull apart for a beachy look.
- Curling Iron: A curling iron with a clamp can create more structured waves, but you can still achieve a beachy look if you don’t curl the hair all the way through. Simply wrap the hair around the barrel and leave the ends out, then release the clamp to let the wave fall naturally.
- Curling Wand: A wand, on the other hand, allows for a more relaxed curl without the clamp. You can wrap the hair around the wand, hold it for a few seconds, and then release it without any indentation from a clip. This is ideal for creating more natural waves.
When using either tool, start curling sections from the mid-lengths to the ends of your hair. Leave the roots untouched to create volume at the crown. Wrap each section of hair around the barrel (away from your face), and hold for about 3-5 seconds. The longer you hold the curl, the tighter the wave will be, so adjust the timing based on the look you desire.
Step 4: Alternate Curl Directions
To create natural-looking waves, alternate the direction in which you curl each section. For example, curl one section away from your face, and then the next towards your face. This adds texture and dimension to the waves, preventing them from looking too uniform or artificial. By alternating curl directions, the waves will appear more relaxed and tousled, which is the essence of beachy waves.
Avoid curling every strand of hair in the same direction, as this can create a more polished, structured look, which is not the goal for beach waves. Keep the waves looking soft and relaxed by making sure they are slightly different from one another.
Step 5: Let Your Hair Cool
Once you’ve finished curling all of your hair, allow it to cool completely. This step is crucial for setting the waves in place. If you brush or touch your hair before it cools, the curls may fall apart or lose their shape. Giving your hair time to cool down allows the waves to set and ensures that they last longer throughout the day.
You can use this time to finish getting ready, or even give yourself a mini massage at the scalp to create additional volume at the roots.
Step 6: Run Your Fingers Through the Waves
Once your hair has cooled, it’s time to loosen up the curls and add texture. The key to achieving effortless beach waves is not to overdo it with combs or brushes. Instead, use your fingers to gently separate and loosen the curls. This will give your waves that soft, tousled look without disturbing their natural flow.
If you prefer a more defined wave, you can use a wide-toothed comb or a brush, but be sure to do this gently. Brushing through the waves too harshly will flatten them and remove the tousled texture.
Step 7: Add a Finishing Product
To ensure that your waves last all day, finish off your style with a texturizing spray or a light-hold hairspray. These products help set the waves and provide additional volume and texture, making sure they stay intact throughout the day. A texturizing spray adds the finishing touch by enhancing the tousled, beachy vibe.
For a more matte finish, use a sea salt spray to add volume and a natural, beachy texture. If you prefer a shiny, glossy look, opt for a light hairspray or shine spray to enhance the sheen of your hair.
Step 8: Maintain Your Waves Throughout the Day
Beach waves are meant to look natural, so don’t stress if they lose a bit of their shape throughout the day. The more relaxed and tousled, the better! However, if you notice the waves falling too much, you can quickly refresh them by curling a few sections with your curling iron or wand and adding a bit more texturizing spray.
Additionally, avoid touching your hair too much during the day, as the oils from your fingers can weigh the waves down and make them look flat.
Additional Tips for Perfect Beach Waves
- Heat Protectant: Always use a heat protectant spray before applying any heat to your hair. This will protect your hair from damage and keep it healthy in the long run.
- Dry Shampoo: If you want to add extra volume or texture to your waves, dry shampoo is a great tool. It helps absorb excess oil and adds lift to the roots, making the waves appear fuller.
- Different Hair Types: If you have straight or fine hair, adding a bit of mousse or sea salt spray will help create the texture necessary for beach waves. For those with curly or coarse hair, you may need to use a flat iron to help smooth out any frizz before styling.
- Overnight Waves: For an even more effortless look, you can try braiding your hair overnight and waking up to natural waves. This method works particularly well if you have naturally wavy or curly hair.